In this chapter, you will learn how to work with static files and serve them to the client correctly.
The application described in this chapter is not intended for use in production environments as-is. Note that successful completion of this entire guide is required to create a production-ready application.
Preparing the environment
If you haven’t prepared your environment during previous steps, please, do it using the instructions provided in the “Preparing the environment” chapter.
If your environment has stopped working or instructions in this chapter don’t work, please, refer to these hints:
Let’s launch Docker Desktop. It takes some time for this application to start Docker. If there are no errors during the startup process, check that Docker is running and is properly configured:
docker run hello-world
You will see the following output if the command completes successfully:
Unable to find image 'hello-world:latest' locally
latest: Pulling from library/hello-world
b8dfde127a29: Pull complete
Digest: sha256:9f6ad537c5132bcce57f7a0a20e317228d382c3cd61edae14650eec68b2b345c
Status: Downloaded newer image for hello-world:latest

Hello from Docker!
This message shows that your installation appears to be working correctly.
Should you have any problems, please refer to the Docker documentation.
Let’s launch the Docker Desktop application. It takes some time for the application to start Docker. If there are no errors during the startup process, then check that Docker is running and is properly configured:
docker run hello-world
You will see the following output if the command completes successfully:
Unable to find image 'hello-world:latest' locally
latest: Pulling from library/hello-world
b8dfde127a29: Pull complete
Digest: sha256:9f6ad537c5132bcce57f7a0a20e317228d382c3cd61edae14650eec68b2b345c
Status: Downloaded newer image for hello-world:latest

Hello from Docker!
This message shows that your installation appears to be working correctly.
Should you have any problems, please refer to the Docker documentation.
Start Docker:
sudo systemctl restart docker
Make sure that Docker is running:
sudo systemctl status docker
If the Docker start is successful, you will see the following output:
● docker.service - Docker Application Container Engine
     Loaded: loaded (/lib/systemd/system/docker.service; enabled; vendor preset: enabled)
     Active: active (running) since Thu 2021-06-24 13:05:17 MSK; 13s ago
TriggeredBy: ● docker.socket
       Docs: https://docs.docker.com
   Main PID: 2013888 (dockerd)
      Tasks: 36
     Memory: 100.3M
     CGroup: /system.slice/docker.service
             └─2013888 /usr/bin/dockerd -H fd:// --containerd=/run/containerd/containerd.sock

dockerd[2013888]: time="2021-06-24T13:05:16.936197880+03:00" level=warning msg="Your kernel does not support CPU realtime scheduler"
dockerd[2013888]: time="2021-06-24T13:05:16.936219851+03:00" level=warning msg="Your kernel does not support cgroup blkio weight"
dockerd[2013888]: time="2021-06-24T13:05:16.936224976+03:00" level=warning msg="Your kernel does not support cgroup blkio weight_device"
dockerd[2013888]: time="2021-06-24T13:05:16.936311001+03:00" level=info msg="Loading containers: start."
dockerd[2013888]: time="2021-06-24T13:05:17.119938367+03:00" level=info msg="Loading containers: done."
dockerd[2013888]: time="2021-06-24T13:05:17.134054120+03:00" level=info msg="Daemon has completed initialization"
systemd[1]: Started Docker Application Container Engine.
dockerd[2013888]: time="2021-06-24T13:05:17.148493957+03:00" level=info msg="API listen on /run/docker.sock"
Now let’s check if Docker is available and its configuration is correct:
docker run hello-world
You will see the following output if the command completes successfully:
Unable to find image 'hello-world:latest' locally
latest: Pulling from library/hello-world
b8dfde127a29: Pull complete
Digest: sha256:9f6ad537c5132bcce57f7a0a20e317228d382c3cd61edae14650eec68b2b345c
Status: Downloaded newer image for hello-world:latest

Hello from Docker!
This message shows that your installation appears to be working correctly.
Should you have any problems, please refer to the Docker documentation.
Let’s start the minikube cluster we have already configured in the “Preparing the environment” chapter:
minikube start
Set the default Namespace so that you don’t have to specify it every time you invoke kubectl:
kubectl config set-context minikube --namespace=werf-guide-app
You will see the following output if the command completes successfully:
😄  minikube v1.20.0 on Ubuntu 20.04
✨  Using the docker driver based on existing profile
👍  Starting control plane node minikube in cluster minikube
🚜  Pulling base image ...
🎉  minikube 1.21.0 is available! Download it: https://github.com/kubernetes/minikube/releases/tag/v1.21.0
💡  To disable this notice, run: 'minikube config set WantUpdateNotification false'

🔄  Restarting existing docker container for "minikube" ...
🐳  Preparing Kubernetes v1.20.2 on Docker 20.10.6 ...
🔎  Verifying Kubernetes components...
    ▪ Using image gcr.io/google_containers/kube-registry-proxy:0.4
    ▪ Using image k8s.gcr.io/ingress-nginx/controller:v0.44.0
    ▪ Using image registry:2.7.1
    ▪ Using image docker.io/jettech/kube-webhook-certgen:v1.5.1
    ▪ Using image docker.io/jettech/kube-webhook-certgen:v1.5.1
    ▪ Using image gcr.io/k8s-minikube/storage-provisioner:v5
🔎  Verifying registry addon...
🔎  Verifying ingress addon...
🌟  Enabled addons: storage-provisioner, registry, default-storageclass, ingress
🏄  Done! kubectl is now configured to use "minikube" cluster and "werf-guide-app" namespace by default
Make sure that the command output contains the following line:
Restarting existing docker container for "minikube"
Its absence means that a new minikube cluster was created instead of using the old one. In this case, repeat all the steps required to install the environment using minikube.
Now run the command in the background PowerShell terminal (do not close its window):
minikube tunnel --cleanup=true
Let’s start the minikube cluster we have already configured in the “Preparing the environment” chapter:
minikube start --namespace werf-guide-app
Set the default Namespace so that you don’t have to specify it every time you invoke kubectl:
kubectl config set-context minikube --namespace=werf-guide-app
You will see the following output if the command completes successfully:
😄  minikube v1.20.0 on Ubuntu 20.04
✨  Using the docker driver based on existing profile
👍  Starting control plane node minikube in cluster minikube
🚜  Pulling base image ...
🎉  minikube 1.21.0 is available! Download it: https://github.com/kubernetes/minikube/releases/tag/v1.21.0
💡  To disable this notice, run: 'minikube config set WantUpdateNotification false'

🔄  Restarting existing docker container for "minikube" ...
🐳  Preparing Kubernetes v1.20.2 on Docker 20.10.6 ...
🔎  Verifying Kubernetes components...
    ▪ Using image gcr.io/google_containers/kube-registry-proxy:0.4
    ▪ Using image k8s.gcr.io/ingress-nginx/controller:v0.44.0
    ▪ Using image registry:2.7.1
    ▪ Using image docker.io/jettech/kube-webhook-certgen:v1.5.1
    ▪ Using image docker.io/jettech/kube-webhook-certgen:v1.5.1
    ▪ Using image gcr.io/k8s-minikube/storage-provisioner:v5
🔎  Verifying registry addon...
🔎  Verifying ingress addon...
🌟  Enabled addons: storage-provisioner, registry, default-storageclass, ingress
🏄  Done! kubectl is now configured to use "minikube" cluster and "werf-guide-app" namespace by default
Make sure that the command output contains the following line:
Restarting existing docker container for "minikube"
Its absence means that a new minikube cluster was created instead of using the old one. In this case, repeat all the steps required to install the environment from scratch using minikube.
If you have inadvertently deleted Namespace of the application, you must run the following commands to proceed with the guide:
kubectl create namespace werf-guide-app
kubectl create secret docker-registry registrysecret \
  --docker-server='https://index.docker.io/v1/' \
  --docker-username='<Docker Hub username>' \
  --docker-password='<Docker Hub password>'
You will see the following output if the command completes successfully:
namespace/werf-guide-app created
secret/registrysecret created
If nothing worked, repeat all the steps described in the “Preparing the environment” chapter and create a new environment from scratch. If creating an environment from scratch did not help either, please, tell us about your problem in our Telegram chat or create an issue on GitHub. We will be happy to help you!
Preparing the repository
Update the existing repository containing the application:
Run the following commands in PowerShell:
cd ~/werf-guide/app

# To see what changes we will make later in this chapter, let's replace all the application files
# in the repository with new, modified files containing the changes described below.
git rm -r .
cp -Recurse -Force ~/werf-guide/guides/examples/django/030_assets/* .
git add .
git commit -m WIP
# Enter the command below to show the files we are going to change.
git show --stat
# Enter the command below to show the changes that will be made.
git show
Run the following commands in Bash:
cd ~/werf-guide/app

# To see what changes we will make later in this chapter, let's replace all the application files
# in the repository with new, modified files containing the changes described below.
git rm -r .
cp -rf ~/werf-guide/guides/examples/django/030_assets/. .
git add .
git commit -m WIP
# Enter the command below to show files we are going to change.
git show --stat
# Enter the command below to show the changes that will be made.
git show
Doesn’t work? Try the instructions on the “I am just starting from this chapter” tab above.
Prepare a new repository with the application:
Run the following commands in PowerShell:
# Clone the example repository to ~/werf-guide/guides (if you have not cloned it yet).
if (-not (Test-Path ~/werf-guide/guides)) {
  git clone https://github.com/werf/website $env:HOMEPATH/werf-guide/guides
}

# Copy the (unchanged) application files to ~/werf-guide/app.
rm -Recurse -Force ~/werf-guide/app
cp -Recurse -Force ~/werf-guide/guides/examples/django/020_logging ~/werf-guide/app

# Make the ~/werf-guide/app directory a git repository.
cd ~/werf-guide/app
git init
git add .
git commit -m initial

# To see what changes we will make later in this chapter, let's replace all the application files
# in the repository with new, modified files containing the changes described below.
git rm -r .
cp -Recurse -Force ~/werf-guide/guides/examples/django/030_assets/* .
git add .
git commit -m WIP
# Enter the command below to show the files we are going to change.
git show --stat
# Enter the command below to show the changes that will be made.
git show
Run the following commands in Bash:
# Clone the example repository to ~/werf-guide/guides (if you have not cloned it yet).
test -e ~/werf-guide/guides || git clone https://github.com/werf/website ~/werf-guide/guides

# Copy the (unchanged) application files to ~/werf-guide/app.
rm -rf ~/werf-guide/app
cp -rf ~/werf-guide/guides/examples/django/020_logging ~/werf-guide/app

# Make the ~/werf-guide/app directory a git repository.
cd ~/werf-guide/app
git init
git add .
git commit -m initial

# To see what changes we will make later in this chapter, let's replace all the application files
# in the repository with new, modified files containing the changes described below.
git rm -r .
cp -rf ~/werf-guide/guides/examples/django/030_assets/. .
git add .
git commit -m WIP
# Enter the command below to show files we are going to change.
git show --stat
# Enter the command below to show the changes that will be made.
git show
Adding an /image page to the application
Let’s add a new /image endpoint to our application. It will return a page with a set of static files. We will use to bundle all JS, CSS, and media files.
...
path('image', include('image.urls')),
This path will be handled by the image standard controller method, which returns the template text:
from django.http import HttpResponse
from django.shortcuts import render

def index(request):
    return HttpResponse(render(request, "./templates/image.html"))
The application now has a new endpoint called /image in addition to the /ping endpoint we made in previous chapters. This new endpoint displays a page that uses different types of static files.
The commands provided at the beginning of the chapter allow you to view a complete, exhaustive list of the changes made to the application in the current chapter.
Serving static files
Django has no built-in means to distribute static files in a production environment. The best way to do this is to use a reverse proxy like NGINX.
There are several ways to hide a Django application behind a reverse proxy in Kubernetes. We will use a popular and simple one, which nevertheless scales well. In it, an NGINX container (in the same Pod) runs in front of each application container and proxies all requests except for static file requests into the application. The NGINX container then reads the static files and serves them to the client.
Now, let’s get to the implementation.
Making changes to the build and deploy process
First of all, we have to make changes to the application build process. Now we need to build an application image and an NGINX image. The latter should contain static application files that NGINX can send to the client, bypassing the application:
# Here, a multi-stage build is used to assemble the image.
# The image to deploy to the cluster.
FROM python:3-alpine as backend
WORKDIR /app

RUN apk add python3-dev gcc libc-dev linux-headers

# Install the Django web framework.
RUN python -m pip install Django uwsgi

# Copy application files into the image.
COPY app .

# The NGINX image that contains the static files.
FROM nginx:stable-alpine as frontend
WORKDIR /www
# Copy static files.
COPY app/static /app/static
# Copy NGINX configuration.
COPY .werf/nginx.conf /etc/nginx/nginx.conf
During the build, the NGINX configuration file will be added to the NGINX image:
user nginx;
worker_processes 1;
pid /run/nginx.pid;

events {
  worker_connections 1024;
}

http {
  include /etc/nginx/mime.types;
  default_type application/octet-stream;

  upstream backend {
    server 127.0.0.1:8000 fail_timeout=0;
  }

  server {
    listen 80;
    server_name _;

    root /app;

    client_max_body_size 100M;
    keepalive_timeout 10s;

    # For the /static path, serve the assets directly from the NGINX container file system.
    location /static {

      expires 1y;
      add_header Cache-Control public;
      add_header Last-Modified "";
      add_header ETag "";

      # If possible, serve pre-compressed files (instead of compressing them on the fly).
      gzip_static on;

      access_log off;

      try_files $uri =404;
    }

    # Serve media assets (images, etc.) directly from the NGINX container file system,
    # but turn off gzip compression.
    location /static/images {
      expires 1y;
      add_header Cache-Control public;
      add_header Last-Modified "";
      add_header ETag "";

      access_log off;

      try_files $uri =404;
    }

    # All requests, except for asset requests, are sent to the backend.
    location / {
      proxy_set_header X-Forwarded-For $proxy_add_x_forwarded_for;
      proxy_set_header X-Real-IP $remote_addr;
      proxy_set_header X-Forwarded-Proto $scheme;
      proxy_set_header Host $http_host;
      proxy_redirect off;

      proxy_pass http://backend;
    }
  }
}
Let’s update the werf.yaml configuration so that werf will build and save two images (backend, frontend) instead of one:
project: werf-guide-app
configVersion: 1

---
image: backend
dockerfile: Dockerfile
target: backend

---
image: frontend
dockerfile: Dockerfile
target: frontend
Add a new NGINX container to the application Deployment:
apiVersion: apps/v1
kind: Deployment
metadata:
  name: werf-guide-app
spec:
  replicas: 1
  selector:
    matchLabels:
      app: werf-guide-app
  template:
    metadata:
      labels:
        app: werf-guide-app
    spec:
      imagePullSecrets:
      - name: registrysecret
      containers:
      - name: backend
        image: {{ .Values.werf.image.backend }}
        command:
          - uwsgi
          - --ini
          - uwsgi.ini
        ports:
          - containerPort: 8000
      - name: frontend
        image: {{ .Values.werf.image.frontend }}
        ports:
        - containerPort: 80
From now on, Service and Ingress should connect to port 80 instead of 8000 so that all requests are routed through NGINX and not directly to our application:
apiVersion: v1
kind: Service
metadata:
  name: werf-guide-app
spec:
  selector:
    app: werf-guide-app
  ports:
  - name: http
    port: 80
apiVersion: networking.k8s.io/v1
kind: Ingress
metadata:
  annotations:
    kubernetes.io/ingress.class: nginx
  name: werf-guide-app
spec:
  rules:
  - host: werf-guide-app.test
    http:
      paths:
      - path: /
        pathType: Prefix
        backend:
          service:
            name: werf-guide-app
            port:
              number: 80
Checking that everything works as expected
Now we have to re-deploy our application:
werf converge --repo <DOCKER HUB USERNAME>/werf-guide-app
You should see the following output:
┌ Concurrent builds plan (no more than 5 images at the same time)
│ Set #0:
│ - ⛵ image backend
│ - ⛵ image frontend
└ Concurrent builds plan (no more than 5 images at the same time)

┌ ⛵ image backend
│ ┌ Building stage backend/dockerfile
│ │ ┌ Store stage into <DOCKER HUB USERNAME>/werf-guide-app
│ │ └ Store stage into <DOCKER HUB USERNAME>/werf-guide-app (15.78 seconds)
│ ├ Info
│ │      name: <DOCKER HUB USERNAME>/werf-guide-app:cf5590998ceb58c40162074a122a500a7204f344a7f504f78c86d46a-1661280713456
│ │        id: 3e13913cc634
│ │   created: 2022-08-23 21:51:52 +0000 UTC
│ │      size: 121.8 MiB
│ └ Building stage backend/dockerfile (17.90 seconds)
└ ⛵ image backend (25.67 seconds)

┌ ⛵ image frontend
│ ┌ Building stage frontend/dockerfile
│ │ ┌ Store stage into <DOCKER HUB USERNAME>/werf-guide-app
│ │ └ Store stage into <DOCKER HUB USERNAME>/werf-guide-app (19.71 seconds)
│ ├ Info
│ │      name: <DOCKER HUB USERNAME>/werf-guide-app:9f99e8235e7ac4b9c0c78addfa0a4ffd986e4bd25067a0bf404fcdfb-1661280726477
│ │        id: e29f51e2ac94
│ │   created: 2022-08-23 21:52:04 +0000 UTC
│ │      size: 9.7 MiB
│ └ Building stage frontend/dockerfile (35.32 seconds)
└ ⛵ image frontend (42.50 seconds)

┌ Waiting for resources to become ready
│ ┌ Status progress
│ │ DEPLOYMENT
│ │ werf-guide-app
│ └ Status progress
└ Waiting for resources to become ready (9.39 seconds)

Release "werf-guide-app" has been upgraded. Happy Helming!
NAME: werf-guide-app
LAST DEPLOYED: Tue Aug 23 21:52:34 2022
LAST PHASE: rollout
LAST STAGE: 0
NAMESPACE: werf-guide-app
STATUS: deployed
REVISION: 2
TEST SUITE: None
Running time 58.55 seconds
Before accessing the application, start the Minikube tunnel to expose the Ingress controller externally:
minikube tunnel
Keep this terminal running while you use the application. This command creates a network route on your machine to access the LoadBalancer service inside Minikube.
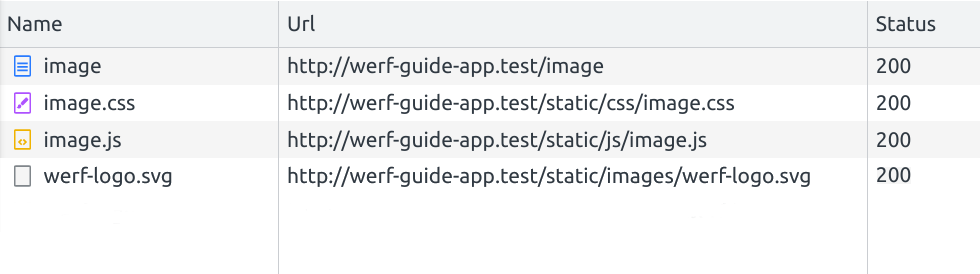
Go to http://werf-guide-app.test/image in your browser and click on the Get image button. You should see the following output:

Note which resources were requested and which links were used (the last resource here was retrieved via the Ajax request):
Now our application not only provides an API but boasts a set of tools to manage static and JavaScript files effectively.
Furthermore, our application can handle a high load since many requests for static files will not affect the operation of the application as a whole. Note that you can quickly scale of a Django application (serves dynamic content) and NGINX (serves static content) by increasing the number of replicas in the application’s Deployment.