In this article, we will explore various options for configuring CI/CD using GitLab CI/CD and werf.
A typical pipeline includes the following stages:
build— stage for building and publishing app images;deploy— stage to deploy an application to one of the cluster environments;dismiss— stage for deleting an application in the review environment;cleanup— stage to clean up the container registry.
The set of tiers (as well as GitLab environments) in a Kubernetes cluster may vary depending on multiple factors. In this article, we will discuss various options of setting up environments for the following tiers:
- Production;
- Staging;
- Review.
Below, we discuss various pipeline stages and options for setting them up. We will start with general terms and then proceed to the particularities. At the end of the article, you may find ready-made .gitlab-ci.yml files tailored for specific workflows.
Regardless of the workflow in question, all configuration versions are subject to the following rules:
- Building and publishing are performed after each push to the repository.
- Deploying/deleting review environments:
- You can only roll out to the review environment as part of the Merge Request (MR).
- Review environments are deleted using GitHub tools (by clicking the button in the Environment section), or automatically when a branch is deleted, or if there is no activity in the MR for a day.
- The cleanup process runs once a day according to the master schedule.
There are various configuration options for deploying to review, staging, and production environments. Each option for the staging and production environments is complemented by several ways to roll back the release in production.
Requirements
- Running Kubernetes cluster with the configured kubectl CLI tool;
- GitLab server version higher than 10.x (or account on SaaS GitLab);
- The container registry (either integrated in GitLab or dedicated);
- An application you can successfully build and deploy with werf;
- A good understanding of the fundamentals of GitLab CI/CD.
Infrastructure
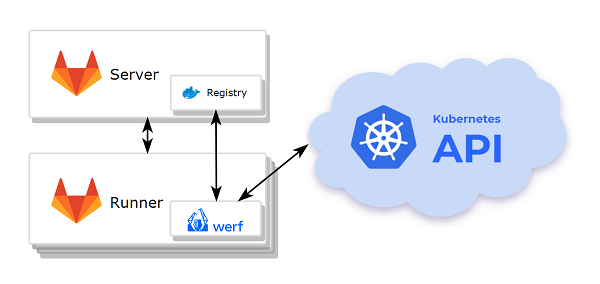
- Kubernetes cluster
- GitLab with an integrated container registry.
- A node (or a group of nodes) with werf and dependencies pre-installed.
The deployment process requires access to the cluster via kubectl, so you have to install and configure the kubectl interface on the node where werf will be run.
werf will use the default kubectl context if there is no context specified via the --kube-context option or the WERF_KUBE_CONTEXT environment variable.
werf requires access to the following nodes it uses:
- to the git repository where the application code is stored;
- to the container registry;
- to the Kubernetes cluster.
Setting up the runner
Let us install and configure the GitLab runner on the node where werf will be run:
- First, create a project in GitLab and push the application code into it.
- Get a registration token for the GitLab runner:
- in your GitLab project open
Settings—>CI/CD, - expand the
Runnerstab and find the token in the sectionSetup a specific Runner manually.
- in your GitLab project open
- Install the GitLab runner according to the guide.
- Register the
gitLab-runnerby following all the necessary steps. Note:- enter
werfas the tag associated with the runner; - enter
shellas the runner executor.
- enter
-
Add the
gitlab-runneruser to thedockergroup.sudo usermod -aG docker gitlab-runner - Install werf.
-
Install
kubectland copy the kubectl config to the home directory of the gitlab-runner user.mkdir -p /home/gitlab-runner/.kube && sudo cp -i /etc/kubernetes/admin.conf /home/gitlab-runner/.kube/config && sudo chown -R gitlab-runner:gitlab-runner /home/gitlab-runner/.kube
Once the GitLab runner is up and ready, you can start configuring the pipeline.
werf activate
Define a default array of commands that should run before the script commands in all jobs.
before_script:
  - type trdl && . $(trdl use werf 2 stable)
  - type werf && source $(werf ci-env gitlab --as-file)
Building and publishing application images
Build and Publish:
  stage: build
  script:
    - werf build
  except: [schedules]
  tags: [werf]
It should be noted that cleaning up stages and the container registry implies running the corresponding task according to a schedule. Since building images during the cleanup is not needed, you should specify except: [schedules] so that the build stage is not triggered when the pipeline is running on a schedule.
The task configuration is quite simple, that is why we prefer to focus on what it lacks — an explicit authorization in the container registry, and calling the docker login.
In the simplest case, if an integrated container registry is used, then the authorization is performed automatically when the werf ci-env command is executed. The CI_JOB_TOKEN (you can learn more about the GitLab job permissions model here) and CI_REGISTRY_IMAGE GitLab environment variables act as arguments in this case.
As a result of the werf ci-env command, a temporary docker config is created. It is used by all the commands in the shell session (including docker). It means that parallel tasks do not overlap when using docker, and the temporary token is preserved (not overwritten) in the configuration.
If you need to authorize using the custom credentials, the docker login command must be executed after invoking werf ci-env.
Deploying an application
First of all, you need to define a template – the general part of the deployment process suitable for any tier. This way, you will decrease the size of the .gitlab-ci.yml file while improving its readability. This will allow you to focus on the workflow.
.base_deploy:
  stage: deploy
  script:
    - werf converge -Z --set "env_url=$(echo ${CI_ENVIRONMENT_URL} | cut -d / -f 3)"
  except: [schedules]
  tags: [werf]
With the base_deploy template, each tier will have its own GitLab environment:
Example:
  extends: .base_deploy
  environment:
    name: <environment name>
    url: <url>
    # ...
  # ...
When running a job, werf ci-env sets the WERF_ENV variable according to the GitLab environment name (CI_ENVIRONMENT_SLUG)
In order to configure the application for using in different tiers, you can take advantage of Go templates and the .Values.werf.env variable in helm templates. This is analogous to setting the –-env option or the WERF_ENV environment variable.
The template also makes use of the environment address – the URL for accessing the application deployed to the tier. It is passed via the env_url parameter.
This value can be used in helm templates, for example, for configuring Ingress resources.
Below, we will discuss some popular strategies and practices that may serve as a basis for building your processes in GitLab.
Setting up a review environment – various scenarios
As we said before, the review environment is a temporary tier. That is why, in addition to the deployment, this environment should also have a cleanup process.
It is required to add
.werf-deploy-report.jsonfile into the.gitignorefor provided example.
Let us look at the basic configurations of Review and Stop Review jobs. They will serve as the basis for all the options.
Review:
  extends: .base_deploy
  variables:
    WERF_SAVE_DEPLOY_REPORT: "1"
  environment:
    name: review-${CI_MERGE_REQUEST_ID}
    url: http://${CI_PROJECT_NAME}-${CI_MERGE_REQUEST_ID}.kube.DOMAIN
    on_stop: Stop Review
    auto_stop_in: 1 day
  artifacts:
    paths:
      - .werf-deploy-report.json
  only: [merge_requests]

Stop Review:
  stage: dismiss
  script:
    - werf dismiss --with-namespace --use-deploy-report
  environment:
    name: review-${CI_MERGE_REQUEST_ID}
    action: stop
  variables:
    GIT_STRATEGY: none
  only: [merge_requests]
  when: manual
  tags: [werf]
The Review job defines the deployment of a review release to a dynamic environment, the name of which is based on an unique MR identifier. The auto_stop_in parameter allows you to specify a period of inactivity in the MR. The GitLab environment will be automatically stopped after this period is over. Stopping the GitLab environment does not affect resources in the cluster or a review release in any way. Therefore, we need to define the job that is called when the environment is being stopped (on_stop). In our case, this is a Stop Review job.
The Stop Review job deletes the review release and shuts down the GitLab environment (action: stop): werf deletes the helm release and the associated Kubernetes namespace with all its contents (werf dismiss). You can run the Stop Review job manually after the deployment to the review tier is complete, or automatically via the GitLab server (for example, when the corresponding branch is deleted as a result of merging with master, provided that the appropriate option is set in the GitLab interface).
The werf dismiss command requires werf.yaml to work, because this file contains templates for the release name and the namespace. It is not possible to use the source code from the git when deleting a branch, that is why we use werf.yaml (it was saved when the Review job was running), while pulling changes from git is disabled (GIT_STRATEGY: none).
Thus, by default, we have the following options for deleting the review environment:
- manually;
- automatically when there is no activity in the MR for a day and when a branch is deleted.
Now, let us explore main strategies to deploy the review environment.
We do not limit you to the options offered, but quite the opposite: we recommend combining them and creating a workflow configuration that suits your team’s needs.
1. Manually
This option implements the approach described in the section Deploy to review using a pull request at the click of a button
With this approach, the user deploys and deletes the environment by clicking the button in the pipeline.
It is the most simplistic approach that can be useful when rollouts are rare, and the review environment is not used during development. In essence, it is used for testing before accepting a MR.
Review:
  extends: .base_deploy
  variables:
    WERF_SAVE_DEPLOY_REPORT: "1"
  environment:
    name: review-${CI_MERGE_REQUEST_ID}
    url: http://${CI_PROJECT_NAME}-${CI_MERGE_REQUEST_ID}.kube.DOMAIN
    on_stop: Stop Review
    auto_stop_in: 1 day
  artifacts:
    paths:
      - .werf-deploy-report.json
  only: [merge_requests]
  when: manual

Stop Review:
  stage: dismiss
  script:
    - werf dismiss --with-namespace --use-deploy-report
  environment:
    name: review-${CI_MERGE_REQUEST_ID}
    action: stop
  variables:
    GIT_STRATEGY: none
  only: [merge_requests]
  when: manual
  tags: [werf]
2. Automatically using a branch name
This option implements the approach described in the section Automatically deploy to review from a branch using a pattern
In the configuration below, the code is automatically released with every commit in the MR if the name of the git branch has the review- prefix.
Review:
  extends: .base_deploy
  variables:
    WERF_SAVE_DEPLOY_REPORT: "1"
  environment:
    name: review-${CI_MERGE_REQUEST_ID}
    url: http://${CI_PROJECT_NAME}-${CI_MERGE_REQUEST_ID}.kube.DOMAIN
    on_stop: Stop Review
    auto_stop_in: 1 day
  artifacts:
    paths:
      - .werf-deploy-report.json
  rules:
    - if: $CI_MERGE_REQUEST_ID && $CI_COMMIT_REF_NAME =~ /^review-/

Stop Review:
  stage: dismiss
  script:
    - werf dismiss --with-namespace --use-deploy-report
  environment:
    name: review-${CI_MERGE_REQUEST_ID}
    action: stop
  variables:
    GIT_STRATEGY: none
  only: [merge_requests]
  when: manual
  tags: [werf]
3. Semi-automatic mode using a label (recommended)
This option implements the approach described in the section Automatically deploy to review using a pull request; manual triggering
Semi-automatic mode with a label is a comprehensive solution that combines the previous two options.
By assigning a specific label, the user activates automatic deployment to review environments for each commit. When the label is removed, the GitLab environment is stopped and the review release is deleted.
Review:
  stage: deploy
  variables:
    WERF_SAVE_DEPLOY_REPORT: "1"
  script:
    - >
      # do optional deploy/dismiss

      if echo $CI_MERGE_REQUEST_LABELS | tr ',' '\n' | grep -q -P '^review$'; then
        werf converge -Z --set "env_url=$(echo ${CI_ENVIRONMENT_URL} | cut -d / -f 3)"
      else
        if werf helm get $(werf helm get-release) 2>/dev/null; then
          werf dismiss --with-namespace
        fi
      fi
  environment:
    name: review-${CI_MERGE_REQUEST_ID}
    url: http://${CI_PROJECT_NAME}-${CI_MERGE_REQUEST_ID}.kube.DOMAIN
    on_stop: Stop Review
    auto_stop_in: 1 day
  artifacts:
    paths:
      - .werf-deploy-report.json
  only: [merge_requests]
  tags: [werf]

Stop Review:
  stage: dismiss
  script:
    - werf dismiss --with-namespace --use-deploy-report
  environment:
    name: review-${CI_MERGE_REQUEST_ID}
    action: stop
  variables:
    GIT_STRATEGY: none
  only: [merge_requests]
  when: manual
  tags: [werf]
The environment variable CI_MERGE_REQUEST_LABELS is used to check if MR has the label.
Various scenarios for composing staging and production environments
The scenarios described below are the most effective combinations of rules for deploying staging and production environments.
In our case, these environments are the most important ones. Thus, the names of the scenarios correspond to the names of ready-made workflows presented at the end of the article.
1. Fast and Furious (recommended)
This scenario implements the approaches described in Automatically deploy to production from master and Deploy to production-like using a pull request at the click of a button sections.
The code is automatically deployed to production in response to any changes in master. At the same time, you can deploy an application to staging by clicking the button in the MR.
Deploy to Staging:
  extends: .base_deploy
  environment:
    name: staging
    url: http://${CI_PROJECT_NAME}.kube.DOMAIN
  only: [merge_requests]
  when: manual

Deploy to Production:
  extends: .base_deploy
  environment:
    name: production
    url: https://www.company.org
  only: [master]
Options for rolling back changes in production:
- by reverting changes in master (recommended);
- by rolling out a stable MR or via the Rollback button.
2. Push the button
This scenario implements the approaches described in the Deploy to production from master at the click of a button and Automatically deploy to staging from master sections
Deploying to production is triggered by clicking the button associated with the commit in master, and rolling out to staging is performed automatically in response to changes in master.
Deploy to Staging:
  extends: .base_deploy
  environment:
    name: staging
    url: http://${CI_PROJECT_NAME}.kube.DOMAIN
  only: [master]

Deploy to Production:
  extends: .base_deploy
  environment:
    name: production
    url: https://www.company.org
  only: [master]
  when: manual
Options for rolling back changes in production:
- by clicking the button associated with the stable commit or via the Rollback environment button (recommended);
- by using the stable MR and clicking the button.
3. Tag everything (recommended)
This scenario implements the approaches described in the Automatically deploy to production using a tag and Deploy to staging from master at the click of a button
The rollout to production is triggered when the tag is assigned; deploying to staging is performed by clicking the button associated with the specific commit in master.
Deploy to Staging:
  extends: .base_deploy
  environment:
    name: staging
    url: http://${CI_PROJECT_NAME}.kube.DOMAIN
  only: [master]
  when: manual

Deploy to Production:
  extends: .base_deploy
  environment:
    name: production
    url: https://www.company.org
  only:
    - tags
Options for rolling back changes in production:
- by clicking a button associated with a different tag (recommended);
- by assigning a new tag to the old commit (not recommended).
4. Branch, branch, branch!
This scenario implements the approaches described in the Automatically deploy to production from a branch and Automatically deploy to production-like from a branch sections
The code is deployed to production automatically; rolling out to staging is performed in response to changes in the master branch.
Deploy to Staging:
  extends: .base_deploy
  environment:
    name: staging
    url: http://${CI_PROJECT_NAME}.kube.DOMAIN
  only: [master]

Deploy to Production:
  extends: .base_deploy
  environment:
    name: production
    url: https://www.company.org
  only: [production]
Options for rolling back changes in production:
- using the Rollback environment button;
- by reverting changes in the production branch;
- by reverting changes to master and fast-forwarding merge to the production branch;
- by deleting a commit from the production branch and then making a push-force.
Cleaning up Images
Cleanup:
  stage: cleanup
  script:
    - werf cr login -u nobody -p ${WERF_IMAGES_CLEANUP_PASSWORD} ${WERF_REPO}
    - werf cleanup
  only: [schedules]
  tags: [werf]
werf has an efficient built-in cleanup mechanism to avoid overflowing the container registry and the building node with outdated and unused images. You can learn more about the werf’s cleanup functionality here.
To use cleanup, you have to create a Personal Access Token in GitLab with the necessary permissions. This token will be used for authorization in the container registry before cleanup.
For the test project, you can create a Personal Access Token in your GitLab account. To do this, open the Settings page in GitLab (in your profile settings), then open the Access Token section. Enter the token name, select the api in the Scope section, and click the Create personal access token button to get the Personal Access Token.
To pass Personal Access Token to the GitLab environment variable, open your project, click on Settings —> CI/CD, and expand the Variables section. Create a new environment variable called WERF_IMAGES_CLEANUP_PASSWORD and copy the contents of the Personal Access Token to it. For the sake of security, mark the created variable as protected.
The cleanup stage runs on a schedule only. You can define the schedule by opening the CI/CD —> Schedules section of the project settings in GitLab. Click the New schedule button, fill in the task description, and define the launch template in the cron format. Leave the master branch in the Target Branch field (the branch name does not affect the cleanup process), make sure the Active checkbox is selected, and save the pipeline schedule.
The complete .gitlab-ci.yml for ready-made workflows
Workflow Details
You can read more about workflow scenarios in the article
- Building and publishing.
- Deploying to the review tier via the strategy No. 3 Semi-automatic mode using a label (recommended).
- Deploying to staging and production tiers via the strategy No. 1 Fast and Furious (recommended).
- Cleaning up stages.
.gitlab-ci.yml
stages:
  - build
  - deploy
  - dismiss
  - cleanup

before_script:
  - type trdl && . $(trdl use werf 2 stable)
  - type werf && source $(werf ci-env gitlab --as-file)

Build and Publish:
  stage: build
  script:
    - werf build
  except: [schedules]
  tags: [werf]

.base_deploy:
  stage: deploy
  script:
    - werf converge -Z --set "env_url=$(echo ${CI_ENVIRONMENT_URL} | cut -d / -f 3)"
  tags: [werf]

Review:
  stage: deploy
  variables:
    WERF_SAVE_DEPLOY_REPORT: "1"
  script:
    - >
      # do optional deploy/dismiss

      if echo $CI_MERGE_REQUEST_LABELS | tr ',' '\n' | grep -q -P '^review$'; then
        werf converge -Z --set "env_url=$(echo ${CI_ENVIRONMENT_URL} | cut -d / -f 3)"
      else
        if werf helm get $(werf helm get-release) 2>/dev/null; then
          werf dismiss --with-namespace
        fi
      fi
  environment:
    name: review-${CI_MERGE_REQUEST_ID}
    url: http://${CI_PROJECT_NAME}-${CI_MERGE_REQUEST_ID}.kube.DOMAIN
    on_stop: Stop Review
    auto_stop_in: 1 day
  artifacts:
    paths:
      - .werf-deploy-report.json
  only: [merge_requests]
  tags: [werf]

Stop Review:
  stage: dismiss
  script:
    - werf dismiss --with-namespace --use-deploy-report
  environment:
    name: review-${CI_MERGE_REQUEST_ID}
    action: stop
  variables:
    GIT_STRATEGY: none
  only: [merge_requests]
  when: manual
  tags: [werf]

Deploy to Staging:
  extends: .base_deploy
  environment:
    name: staging
    url: http://${CI_PROJECT_NAME}.kube.DOMAIN
  only: [merge_requests]
  when: manual

Deploy to Production:
  extends: .base_deploy
  environment:
    name: production
    url: https://www.company.org
  only: [master]

Cleanup:
  stage: cleanup
  script:
    - werf cr login -u nobody -p ${WERF_IMAGES_CLEANUP_PASSWORD} ${WERF_REPO}
    - werf cleanup
  only: [schedules]
  tags: [werf]
Workflow Details
You can read more about workflow scenarios in the article
- Building and publishing.
- Deploying to the review tier via the strategy No. 1 Manually.
- Deploying to staging and production tiers via the strategy No. 2 Push the Button.
- Cleaning up stages.
.gitlab-ci.yml
stages:
  - build
  - deploy
  - dismiss
  - cleanup

before_script:
  - type trdl && . $(trdl use werf 2 stable)
  - type werf && source $(werf ci-env gitlab --as-file)

Build and Publish:
  stage: build
  script:
    - werf build
  except: [schedules]
  tags: [werf]

.base_deploy:
  stage: deploy
  script:
    - werf converge -Z --set "env_url=$(echo ${CI_ENVIRONMENT_URL} | cut -d / -f 3)"
  except: [schedules]
  tags: [werf]

Review:
  extends: .base_deploy
  variables:
    WERF_SAVE_DEPLOY_REPORT: "1"
  environment:
    name: review-${CI_MERGE_REQUEST_ID}
    url: http://${CI_PROJECT_NAME}-${CI_MERGE_REQUEST_ID}.kube.DOMAIN
    on_stop: Stop Review
    auto_stop_in: 1 day
  artifacts:
    paths:
      - .werf-deploy-report.json
  only: [merge_requests]
  when: manual

Stop Review:
  stage: dismiss
  script:
    - werf dismiss --with-namespace --use-deploy-report
  environment:
    name: review-${CI_MERGE_REQUEST_ID}
    action: stop
  variables:
    GIT_STRATEGY: none
  only: [merge_requests]
  when: manual
  tags: [werf]

Deploy to Staging:
  extends: .base_deploy
  environment:
    name: staging
    url: http://${CI_PROJECT_NAME}.kube.DOMAIN
  only: [master]

Deploy to Production:
  extends: .base_deploy
  environment:
    name: production
    url: https://www.company.org
  only: [master]
  when: manual

Cleanup:
  stage: cleanup
  script:
    - werf cr login -u nobody -p ${WERF_IMAGES_CLEANUP_PASSWORD} ${WERF_REPO}
    - werf cleanup
  only: [schedules]
  tags: [werf]
Workflow Details
You can read more about workflow scenarios in the article
- Building and publishing.
- Deploying to the review tier via the strategy No. 1 Manually.
- Deploying to staging and production tiers via the strategy No. 3 Tag Everything.
- Cleaning up stages.
.gitlab-ci.yml
stages:
  - build
  - deploy
  - dismiss
  - cleanup

before_script:
  - type trdl && . $(trdl use werf 2 stable)
  - type werf && source $(werf ci-env gitlab --as-file)

Build and Publish:
  stage: build
  script:
    - werf build
  except: [schedules]
  tags: [werf]

.base_deploy:
  stage: deploy
  script:
    - werf converge -Z --set "env_url=$(echo ${CI_ENVIRONMENT_URL} | cut -d / -f 3)"
  except: [schedules]
  tags: [werf]

Review:
  extends: .base_deploy
  variables:
    WERF_SAVE_DEPLOY_REPORT: "1"
  environment:
    name: review-${CI_MERGE_REQUEST_ID}
    url: http://${CI_PROJECT_NAME}.kube.DOMAIN
    on_stop: Stop Review
    auto_stop_in: 1 day
  artifacts:
    paths:
      - .werf-deploy-report.json
  only: [merge_requests]
  when: manual

Stop Review:
  stage: dismiss
  script:
    - werf dismiss --with-namespace --use-deploy-report
  environment:
    name: review-${CI_MERGE_REQUEST_ID}
    action: stop
  variables:
    GIT_STRATEGY: none
  only: [merge_requests]
  when: manual
  tags: [werf]

Deploy to Staging:
  extends: .base_deploy
  environment:
    name: staging
    url: http://${CI_PROJECT_NAME}.kube.DOMAIN
  only: [master]
  when: manual

Deploy to Production:
  extends: .base_deploy
  environment:
    name: production
    url: https://www.company.org
  only: [tags]

Cleanup:
  stage: cleanup
  script:
    - werf cr login -u nobody -p ${WERF_IMAGES_CLEANUP_PASSWORD} ${WERF_REPO}
    - werf cleanup
  only: [schedules]
  tags: [werf]
Workflow Details
You can read more about workflow scenarios in the article
- Building and publishing.
- Deploying to the review tier via the strategy No. 2 Automatically using a branch name.
- Deploying to staging and production tiers via the strategy No. 4 Branch, branch, branch!.
- Cleaning up stages.
.gitlab-ci.yml
stages:
  - build
  - deploy
  - dismiss
  - cleanup

before_script:
  - type trdl && . $(trdl use werf 2 stable)
  - type werf && source $(werf ci-env gitlab --as-file)

Build and Publish:
  stage: build
  script:
    - werf build
  except: [schedules]
  tags: [werf]

.base_deploy:
  stage: deploy
  script:
    - werf converge -Z --set "env_url=$(echo ${CI_ENVIRONMENT_URL} | cut -d / -f 3)"
  except: [schedules]
  tags: [werf]

Review:
  extends: .base_deploy
  variables:
    WERF_SAVE_DEPLOY_REPORT: "1"
  environment:
    name: review-${CI_MERGE_REQUEST_ID}
    url: http://${CI_PROJECT_NAME}.kube.DOMAIN
    on_stop: Stop Review
    auto_stop_in: 1 day
  artifacts:
    paths:
      - .werf-deploy-report.json
  rules:
    - if: $CI_MERGE_REQUEST_ID && $CI_COMMIT_REF_NAME =~ /^review-/

Stop Review:
  stage: dismiss
  script:
    - werf dismiss --with-namespace --use-deploy-report
  environment:
    name: review-${CI_MERGE_REQUEST_ID}
    action: stop
  variables:
    GIT_STRATEGY: none
  only: [merge_requests]
  when: manual
  tags: [werf]

Deploy to Staging:
  extends: .base_deploy
  environment:
    name: staging
    url: http://${CI_PROJECT_NAME}.kube.DOMAIN
  only: [master]

Deploy to Production:
  extends: .base_deploy
  environment:
    name: production
    url: https://www.company.org
  only: [production]

Cleanup:
  stage: cleanup
  script:
    - werf cr login -u nobody -p ${WERF_IMAGES_CLEANUP_PASSWORD} ${WERF_REPO}
    - werf cleanup
  only: [schedules]
  tags: [werf]